
DIY Ombre Cork Heart
- leilawight
- Nov 19, 2015
- 3 min read
Materials: • wood board (ours is 24″x 24″ purchased from Home Depot – and it was already precut!) • acrylic paint – you’ll need your accent color (red for us), white, and the background color (gray for us) • vinyl decals (ours are 4″ tall letters) • corks – we used around 100 corks for ours (tip – ask friends and family to save corks for you!) • paint tray with space for at least 6 colors • foam brushes • spray paint (not shown above, but needed for the colors of the letters) • glue gun
Step 1.
Evenly divide your corks into as many groups as colors of paint you’ll be using. This will help to ensure that you have a nice, even gradient on your final product. For us, we used 6 shades of pink, so we grouped all our corks into 6 equal groups.
Step 2.
Mix your accent color (red for us) with white to create 6 shades ranging from deep and dark to quite light. We kept mixing until we got 6 shades of pink that we loved.
Step 3.
With the foam brush, paint the top of the corks, but be sure to not get any paint on the sides of the corks. Since you already created groups in Step 1, you should have about the same number corks for each color.
Leave your corks alone as they dry and move on to Step 4.
Step 4.
While the corks are drying, it’s time to spray paint your board with the color that you’ve selected for your letters. You’ll want to give the board two coats of paint to make sure your letters really pop against the background color. We chose to use a metallic copper color for our letters!
Important: Please remember that the first coat of paint on the board is for your letters, so that’s the color they will appear. We don’t want anyone to get confused and apply the background color first.
Step 5.
Once your letter color is completely dry, place the letters on the board. We picked the phrase “Forever is Today” but you could use any phrase you’d like or even your names and wedding date – “Jen + Jason 12.12.12.” We used a t-square to make sure our words were straight and centered. Once they are, stick the vinyl stickers to the board.
Step 6.
Now you are going to paint over the entire board – yep, right over the letters. This will be your background color. We used gray, since we wanted a good color for our heart to pop against.
Step 7.
Once the background paint is dry comes the fun part. Peel off each letter to reveal the color you spray painted – so for us, the pretty gold metallic color!
Step 8.
Rather than using a new piece of paper, we used an old paper bag from the grocery store, drew a heart and cut it out.
Tip: Before tracing you’re heart to the board, you want to perform a dry run and place all of your corks in advance to make sure you have enough to cover the entire heart. If you don’t have enough, either drink more wine :) or trim the size of your heart to reduce the number of corks you’ll need to fill it.
Once your heart is the right size for the number of corks you have, trace it with a pencil. Be sure to center the hear, as you’ll use the outline to place your corks.
Just to make sure we liked the look, we did a second dry ru
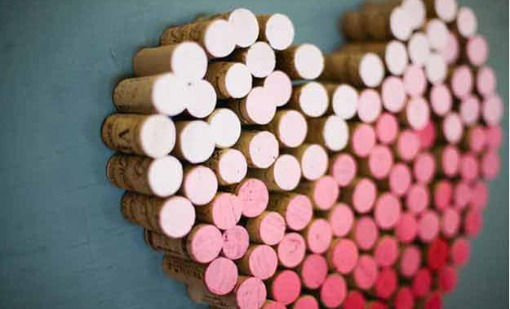
n and placed our corks on the board inside our traced heart. Once we decided we liked the look, we glued them all down using a glue gun.


Comments