
DIY Mason Jar Fairy Lights
- leilawight
- Nov 20, 2015
- 3 min read
Things you'll need:
- Jar (any clean jar will do)
- Glow in the Dark Paint (use several colours if you can)
- Paintbrushes (preferably long ones that will fit to the bottom of the jar)
- Scrap Paper
- White Glue (Optional)
- Glitter (Optional)
Step 1.
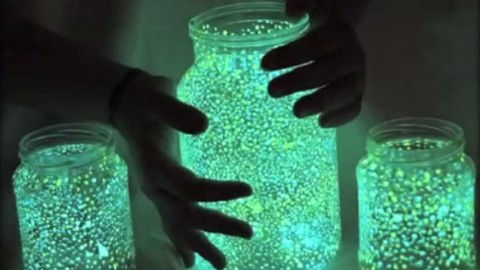
So these jars are an easy DIY idea that you can complete in under 30 minutes. All you need to do is set up your supplies and get to work. Place a piece of scrap paper like an old magazine down and then and squirt some of your assorted glow in the dark paints onto the paper. You want to squeeze out enough paint so that you will be able to paint your jars from the paint on the paper. Place a liberal amount of each color on the paper (as shown below).
Step 2.
I am assuming at this point you have a clean jar for each fairy lantern you will be making. If you do not, please go wash and dry a jar now. Mason jars work great as do old pickle jars and other repurposed glass jars.
Next, you want to start painting your jars with the glow in the dark paint. I recommend using a different paint brush for each paint color, but it is not imperative you do so. Your fairies will look most realistic if you do this (being the fairy painting expert I have now become) but you can always just wash the paint brush between each paint color. I also like to use several colors of glow in the dark paint for each jar, and I will even make some jars in shade of blues and purples, others in yellows and greens, oranges and pinks. Paint your jar starting at the bottom of the inside, dabbing small dots of glow in the dark paint using your brush. If you have several brushes, simply alternate your brushes/paint colors frequently so you get a nice random multi-color effect. I also like to vary the size of the paint dots a little for a more realistic fairy like glow.
Step 3.
Once you have finished painting the inside of your jar, it needs to dry. You can just leave them in a dry place overnight where they will not be bothered, or if you are in more of a hurry and it is daytime, place your fairy jars directly in the sun to dry. In order to activate the glow in the dark paint, you are going to need to allow your jar to soak up UV rays, so it is best to plan this project so that you have time to let it sit in the sun before dark. An hour in the sun should more than suffice for getting your jar to dry and also glow. A bright light bulb can also activate your glow paint, but the sun is going to work best.
Step 4 (Optional)
This additional step is optional but adds a fun touch to your DIY fairy glow jars. Follow this step if you want a glittery lid like we have shown here. We are using a mason jar lid for this one, but you could also get the same effect by just painting the top of a regular jar with glue. Cover the lid with a thin layer of glue and sprinkle it with glitter. This is best done over a paper plate or something you can throw away. Your scrap paper will come in handy again for this step. Shake off the excess glitter and allow the lid to dry.
Step 5.
Once dry, place the inner lid onto the jar and tighten the unpainted lid around it
Step 6.
Any time you want to reactivate your glowing fairy jar, simple recharge the paint with a light bulb or sunlight.


Commentaires